Monday, January 27, 2020

Summer Time - Clarissa, DT

Hello friends, summer has finally arrived here in New Zealand, though we still have cool temperatures in the mornings. I thought of making a card with flowers, as I have been thinking of inking this Simon Says Stamp - Summer Flowers.
I planned around this challenge when I chose my colours as I picked my favourite summer dress below, see floral pattern on the right.

I stamped my images on watercolour paper with tea dye distress ink for no line colouring. I used my Arteza real brush markers and used the tip to tip technique as inspired by the amazing Mona Tóth video tutorial to add a color beside another color to get better transition. Then, I also did dip the brush tip of my marker in very little water to blend the colour in areas where I want the color to show from light to dark tones. Once finished, I accented the corners and shadows with prismacolor pencils. Here is my first panel done.
Here goes my story about a few mistakes while making this card. Stuck this to light grey cardstock and made the mistake of embossing after it which resulted in unfinished lines, so I ended up tracing over the embossing with a fine liner. Next, I decided to make this into a shaker card as well, as my previous entry link doesn't work anymore because I had changed my blog name.
When I added the shaker part, it covered my coloured flowers, so I decided to remove the shaker part very slowly (ahhhh) glad that the foam tame has not stuck well yet, and changed my card into a trifold shaker card, with the shaker part separate, with ample space for writing a note inside. A win win in the end (sigh of relief). For the shaker part, I embossed the words "let's celebrate" and stacked the "you" word twice and ink blended it using walnut stain, wild honey, and carved pumpkin.
Here is my finished card:
Other materials used: you die  - MFT YOU trio die-namics
Uniquely Creative Delicate borders die
Let's Celebrate sentiment - MFT More essential sentiments

Card entered into the following challenges:

Here is my card in action


Thanks for stopping by and have a great day.


Wednesday, January 22, 2020

The Male Room Challenge #128 - It's Snowing

Hello crafty friends. I have some exciting news to share. I have been invited to join the talented team of The Male Room Challenge Blog, and I said yes. This is my first time to be a DT ever, so there are lots of things to learn, but I am grateful to this awesome crafting community for its support and love shared freely. Now onto the newest challenge.

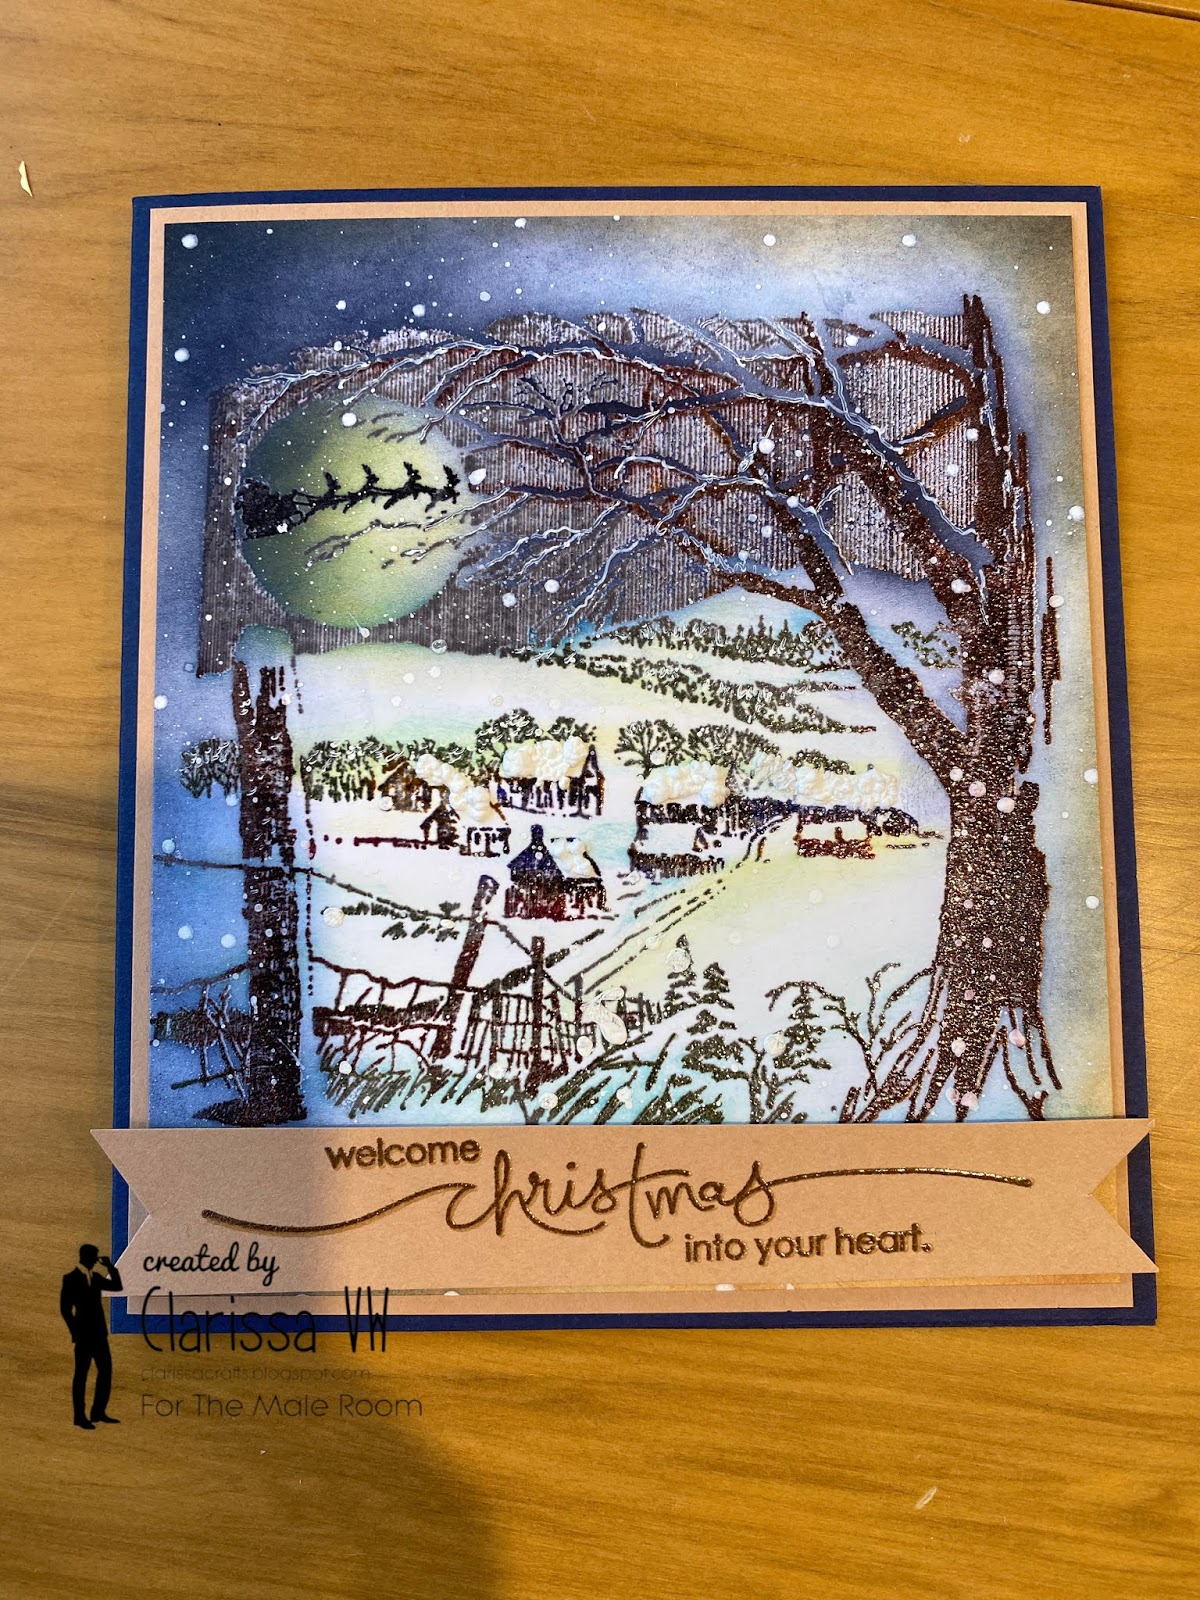
We have a new challenge at TMR # 128 - It's snowing. For my card, I decided to use the Penny Black Santa's visit stamp set.  Here is my finished card:
I breakdown the steps to make my card below:

To colour my stamp, I used a new technique for me which was inspired by Jill Foster's youtube video, water colour stamping using a stamp positioner. I used Arteza real brush markers to add colour to different parts of my images.
Next, I heat embossed my image with clear embossing powder so that the image can resist any ink blending I add to the top. Here is how it looks like.
I also blended in DI salty ocean and SU night of navy to get the dark sky look. Here is my finished card with the sentiment from a retired SU set.
Thank you for stopping by. Feel free to check out our guest designer Pat's creation for this challenge. It is beautiful. In addition, please check out the wonderful creations of our DT members as well and spread the love.
I am entering this card into Jenn Shurkus' Challenge as this is my first Christmas card for 2020.

Thanks for stopping by and Happy crafting.
xo Clarissa

Monday, January 20, 2020

MFT Bithday Yay!

Hello friends. I'm back with another card, my first time to ink up this adorable MFT birth-yay set as my nephew is having a birthday next month. I was inspired by the MFT Wednesday Sketch Challenge #472. First, I lightly ink blended my panel with tumbled glass distress ink using hero arts graphic pattern stencil. Then, I coloured my images with copic markers (colours are listed below). Fussy cut the images and used foam tape to adhere it onto my panel. For the sentiment, I diecut the word CHEERS (requirement of the current MFT Birthday Project) using MFT Pop-up alphabet and ink blended it using mermaid lagoon and mowed lawn. Used the sentiment "sending endless birthday wishes"  to finish off my sentiment. Here is my finished card.
I also added nuvo crystal glaze to give the balloons and "cheers" word some shine. 
Supplies used: paper - Neenah solar white 110lb
frame die - Simon says stamp
Alphabet pop up die - MFT
Birth-Yay MFT stamps
Nuvo crystal glaze
Hero arts graphic pattern stencil
Copic colours used:
Balloon, gift, cupcake and turtle shell - B05, B02, B00
Monkey - C7, c5, c3, c1
Bird body - C5, C3, C1
Balloon2, cupcake base - YR27, YR14, YR21
faces - E93, E000, E00
Ist balloon, turtle, and beak - YG99, YG17, YG13
Hat, cherry - R39, R17, R05

I am entering my card in the following challenges:

Thanks for stopping by and happy crafting!
xo Clarissa


Wednesday, January 15, 2020

A shaker card (Clarissa, DT)

Hello crafty friends. I was inspired by the various shaker cards on the blog and so I thought of making another one, this time with a masculine theme as my FIL will be celebrating his 90th birthday next month. As one of his grandsons is a chef, I pulled out this retired SU Viola stamp set. I coloured my images with copic markers, and used a spotted black and white patterned paper from my stash for the chef's trousers.
To make the shaker element, I stacked six diecut circle frames (cut from stitched nesting dies, using the biggest size, and the next one down) from white cardstock. I ink blended the top most one in peacock feathers and broken china distress oxides. I realised that I could have ink blended the sides as well once I've stacked the diecuts. I used sequins in shades of teal, green, light blue, and light brown. To finish off my sentiment, I used retired Basic Grey diecut stickers (as I didn't have a number and birthday die on hand) and adhered it to cardstock stacked together using the same colours as my sequins. For the black panel, I heat embossed ultra fine clear hero arts embossing powder over the hero arts sunburst bold prints background stamp. Hope you (and my FIL) will like my card. 

Colours used: chef's vest: C3, C1, C0
tie: B02, B41
Cake: B02, B41, B00, YR04, Y00
candle: B02, YR04, YR00, Y00
face and hands: E00, E000, E04

I am entering this card into the following challenges:

Thanks for stopping by and have a great day!
xo Clarissa


Saturday, January 11, 2020

Clarissa, DT

Hello crafty friends. What happens when fairies decide invite gnomes and mice to a baking party in preparation for Valentine's Day? Im excited to share my new project today using lots of Lawn Fawn products. Here is my finished card.


First I decided to make a scalloped box card pop up. For my images, I chose some old stamps (frosty fairy friends and oh gnome). And the newest release from Lawn fawn You're just my type and Love poems to follow the current Lawn fawn challenge, "Something old, something new."

I coloured my images with copic markers following the January Colour Challenge with Butterfly Reflections Ink, to enter this challenge, as when I saw it on Davina's Instagram post, I fell in love with the colours as shown below.
Since I wanted to enter my card into the current Game #9 AAA birthday card challenge: a shaker card, I decided to add a shaker feature to enter this challenge.
And since Valentine's day is fast approaching, I made a valentine's theme's card featuring a pull tab slider element using the Love poems and You're just my type sets from Lawn fawn.
Here is the card I came up with.
Roses are red, violets are blue...
sugar is sweet, and so are you.
the pull tab says: Happy Valentine's Day... 
Have a nice day!
Here is a video showing the card in action.


Thanks for stopping by and crafty hugs to you.!!!


Thursday, January 2, 2020

An extended magic color slider scene!

Hello crafty friends, happy New Year, and this is my first post for the year 2020. Today, I decided to use the Lawn Fawn magic color slider die  and teamed it up with the Critters from the Past stamp set. I used this to make a fun interactive card that I hope my nephew will enjoy when he begins sliding the pull tab. First, I assembled the magic color slider, stamped and coloured my images with copic markers. Then, I challenged myself to draw the background scene using copic markers once again.
When I finished this, I thought to myself that I wanted to make the scene bigger as I loved it so much. So I ended up masking my color slider and some images, and using my stamp perfect, I stamped the images again in another card panel to extent my scene. Used the same colors I have used for the images in the magic color slider as shown below.
I followed the current lawn fanatics inspiration board as I love these colours.
Here is my finished card. Hope you like it.
Thank you for stopping by and happy crafting. I enjoyed making this so much and I hope you try it too.
xo Clarissa


Tuesday, December 31, 2019

Happy new Year!

Hello crafty friends, and today is the last day of 2019. I decided to color this sweet image "A new beginning" from the paper shelter. A great image to welcome 2020 and celebrate the joys, successes as well as the learnings from the past year. Here is my card.
For the background, I used circle stencils coloured in candied apple, squeezed lemonade, peacock feathers and shabby shutters distress oxides. Then added novo shimmer powders in lunar rocket and blue blitz, spritzed water and dried with heating tool. For my sentiment, I used Sunny Studios loopy letters die to create the greeting.
For the image, I coloured it with my copic markers.
I am entering this in the paper shelter christmas challenge - anything goes
Thanks for stopping by and Happy New Year and happy crafting for 2020.
xoxo, Clarissa


Tuesday, December 24, 2019

Cruising by for a birthday wish!

Hello crafty friends. I'm on a roll with posting more crafty news on my blog these days. I would like to share my birthday card using Sunny Studios Cruising critters stamp. I love this image as it is so cute which I coloured with my copic markers. For the background, I used distress inks and added a road die and a cloud stencil (MFT) to finish the scene. I added balloons from MFT Birth-Yay I added a surprise birthday cake from the same stamp set using the Lawn Fawn Let's toast pull tab add on to show the hidden surprise. I finished the scene by adding a MFT banner diecut and stamped the word birthday. I added black gel roll glaze to the eyes to add dimension. Here is my finished card.
I am entering my card to the current  AAA birthday card challenge
I am also entering into the following challenges:

Thanks for stopping by. 
Merry Christmas to you and your family.
xo, Clarissa


Monday, December 23, 2019

Christmas!

Hello crafty friends, I'm back with a new card I made for my family and friends, an altered shadow box card using Away in a manger Hello bluebird stamps. Images were coloured with copic markers and cut wth scan n cut.

To make the card, I started by scoring at 13m 15, and 28cm on a 1/2 A4 panel cut lengthwise.

On another panel 10.5 x 16.5 cm panel, I scored at 1.5 cm on one end and 2cm at the other end. Used the 2nd to the largest MFT Stitched dome die-namics.
For the front panel, I have diet a circle and used distress inks to create a night sky. Used uni-ball white gel pen to add stars. The image is taken off the internet that I printed into card stock as I didn't have wise men stamps.

For the inside, I stamped the sentiment and heat embossed it in fine white embossing powder. Added a few more images.
For the centre panel, I added a ground insert to add my nativity characters. At the outer panel, I adhered the star, angels and other images to create the scene.
For the background, I blended more night sky using distress inks.

I added an extra panel at the back to write a message.
Here is my finished card. Hope you like it. 


I am entering this card into the following challenges:
Thanks for stopping by. Christmas blessings, 
Clarissa


Thursday, December 19, 2019

Clarissa, DT

Hello crafty friends! This is my first time to join in this challenge. I decided to use this Lawn Fawn Woodland Critters Hugger Die and Winter add on for the decoration for the front of my box. I find this die very versatile as you can add different accessories, and I think you can use it all year round, and not just for Christmas. Used various coloured cardstock, a retired Stamping Up designer paper and the LF Perfectly plaid 6x6 .Here is what I came out with at first.

For the box, I made it using my scorpal guide to measure 7 x 10 x 3cm rectangular box. Cut out the tabs a little shorter and rounded the corners as shown here.
Afterwards, I adhered a white cardstock panel behind the critter to make room for a sentment.
Then I adhered this card onto the front of my box. Here is my finished card box. Hope you like it. I will be making more of these boxes for treats to friends and family.

I am entering this box for the Male Room Challenge #126 A Box or Bag

I am also entering this project at 

Thank you for stopping by and Have a lovely Christmas and New Year!
Hugs and blessings,
xoxo Clarissa


Wednesday, December 18, 2019

Celebrating a Milestone

Celebrating a milestone.

Hello crafty friends. I am a PaperShelter fan as I love their digital images. I am also excited to take part in their 9th Anniversary blog hop by making a card for their current "Birthdays/Celebrations" theme. For my card, I used the sweet digi stamp "She's Charming" from the Paper Shelter. It shows a woman pampering herself, getting ready for a party. I decided to have the occasions as a celebration for a 50th birthday, as this calls for a big celebration. Used x-press it blending card coloured with copic markers. I have stacked the word "fabulous" twice and clear embossed it so that it is shiny. Finished off my card with papers and accessories from the Bohemian Sarapapers and accessories kit

Copic colours used:
Skin: E000, E00, E04, R00
Hair: E29, E27, 25, 23
Dress: BG32, 11, 10, R27,14, 11, 00
Puff: R14, 11, 00
Shoes: BG32,11

Mama Elephant Oval Scallop Frames
Papers, buttons, flowers, and split pin: Bohemian Sarapapers and Accessories kit
Word and number dies: EllenHutson (fabulous), MFT (50)

Here is my card:


I am entering this card for the following challenges:


Thanks for stopping by.
Hugs and blessings, Clarissa


Sunday, November 17, 2019

Just a number

Hello crafty friends. I wanted to share this card,  a shaker card I made for a friend who is turning 50. To start off, I made the card base using novo shimmer powder , spritz water and heated with my heat gun. Coloured my image in copic markers. The sentiments, "fabulous and 50, I diecut from glitter cardstock. The remaining sentiment, "its your time to shine" I heat embossed using catherine pooler embossing powder. For the shaker element, I stacked 5 die cuts from mft nested rectangle dies, and sandwiched a clear packaging for me window.

Here is the finished card, hope you like it:

Supplies used: Uptown girl Stampingbella stamp
                        Fabulous die and 50 Ellenhutson
                        Nested rectangle frame die MFT
                        Nuvo shimmer powder -fallingleaves
                      (thank you inkyandstampy.com for sharing some supplies and introducing me to shimmer powders. Loved it.)

Entering this card for the current challenge at #7:
        
Thanks for stopping by and happy crafting!
Clarissa